
Link to section 'Accounts on Negishi' of 'Accounts' Accounts on Negishi
Link to section 'Obtaining an Account' of 'Accounts' Obtaining an Account
To obtain an account, you must be part of a research group which has purchased access to Negishi. Refer to the Accounts / Access page for more details on how to request access.
Link to section 'Outside Collaborators' of 'Accounts' Outside Collaborators
A valid Purdue Career Account is required for access to any resource. If you do not currently have a valid Purdue Career Account you must have a current Purdue faculty or staff member file a Request for Privileges (R4P) before you can proceed.
Logging In
To submit jobs on Negishi, log in to the submission host negishi.rcac.purdue.edu via SSH. This submission host is actually 8 front-end hosts: login00.negishi through login07.negishi. The login process randomly assigns one of these front-ends to each login to negishi.rcac.purdue.edu.
Passwords
Negishi supports either Purdue two-factor authentication (Purdue Login) or SSH keys.
Purdue Login
Link to section 'SSH' of 'Purdue Login' SSH
- SSH to the cluster as usual.
- When asked for a password, type your password followed by "
,push". - Your Purdue Duo client will receive a notification to approve the login.
Link to section 'Thinlinc' of 'Purdue Login' Thinlinc
- When asked for a password, type your password followed by "
,push". - Your Purdue Duo client will receive a notification to approve the login.
- The native Thinlinc client will prompt for Duo approval twice due to the way Thinlinc works.
- The native Thinlinc client also supports key-based authentication.
SSH Client Software
Secure Shell or SSH is a way of establishing a secure connection between two computers. It uses public-key cryptography to authenticate the user with the remote computer and to establish a secure connection. Its usual function involves logging in to a remote machine and executing commands. There are many SSH clients available for all operating systems:
Linux / Solaris / AIX / HP-UX / Unix:
- The
sshcommand is pre-installed. Log in usingssh myusername@negishi.rcac.purdue.edufrom a terminal.
Microsoft Windows:
- MobaXterm is a small, easy to use, full-featured SSH client. It includes X11 support for remote displays, SFTP capabilities, and limited SSH authentication forwarding for keys.
Mac OS X:
- The
sshcommand is pre-installed. You may start a local terminal window from "Applications->Utilities". Log in by typing the commandssh myusername@negishi.rcac.purdue.edu.
When prompted for password, enter your Purdue career account password followed by ",push ". Your Purdue Duo client will then receive a notification to approve the login.
SSH Keys
Link to section 'General overview' of 'SSH Keys' General overview
To connect to Negishi using SSH keys, you must follow three high-level steps:
- Generate a key pair consisting of a private and a public key on your local machine.
- Copy the public key to the cluster and append it to
$HOME/.ssh/authorized_keysfile in your account. - Test if you can ssh from your local computer to the cluster without using your Purdue password.
Detailed steps for different operating systems and specific SSH client softwares are give below.
Link to section 'Mac and Linux:' of 'SSH Keys' Mac and Linux:
-
Run
ssh-keygenin a terminal on your local machine. You may supply a filename and a passphrase for protecting your private key, but it is not mandatory. To accept the default settings, press Enter without specifying a filename.
Note: If you do not protect your private key with a passphrase, anyone with access to your computer could SSH to your account on Negishi. -
By default, the key files will be stored in
~/.ssh/id_rsaand~/.ssh/id_rsa.pubon your local machine. -
Copy the contents of the public key into
$HOME/.ssh/authorized_keyson the cluster with the following command. When asked for a password, type your password followed by ",push". Your Purdue Duo client will receive a notification to approve the login.ssh-copy-id -i ~/.ssh/id_rsa.pub myusername@negishi.rcac.purdue.eduNote: use your actual Purdue account user name.
If your system does not have the
ssh-copy-idcommand, use this instead:cat ~/.ssh/id_rsa.pub | ssh myusername@negishi.rcac.purdue.edu "mkdir -p ~/.ssh && chmod 700 ~/.ssh && cat >> ~/.ssh/authorized_keys" -
Test the new key by SSH-ing to the server. The login should now complete without asking for a password.
-
If the private key has a non-default name or location, you need to specify the key by
ssh -i my_private_key_name myusername@negishi.rcac.purdue.edu
Link to section 'Windows:' of 'SSH Keys' Windows:
| Programs | Instructions |
|---|---|
| MobaXterm | Open a local terminal and follow Linux steps |
| Git Bash | Follow Linux steps |
| Windows 10 PowerShell | Follow Linux steps |
| Windows 10 Subsystem for Linux | Follow Linux steps |
| PuTTY | Follow steps below |
PuTTY:
-
Launch PuTTYgen, keep the default key type (RSA) and length (2048-bits) and click Generate button.
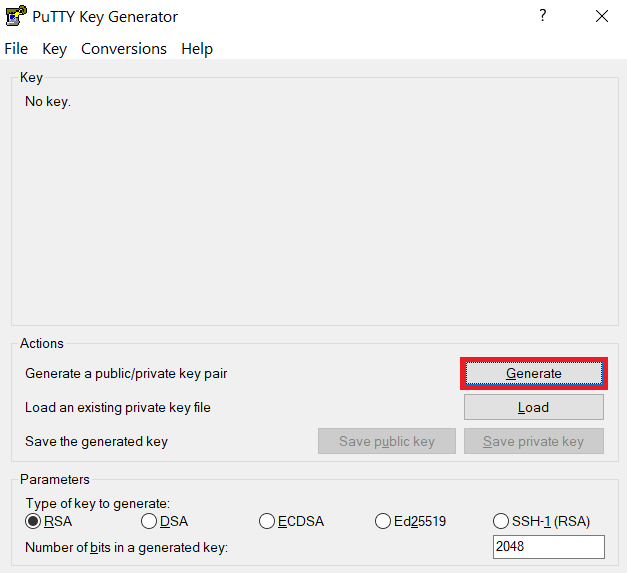
The "Generate" button can be found under the "Actions" section of the PuTTY Key Generator interface. -
Once the key pair is generated:
Use the Save public key button to save the public key, e.g.
Documents\SSH_Keys\mylaptop_public_key.pubUse the Save private key button to save the private key, e.g.
Documents\SSH_Keys\mylaptop_private_key.ppk. When saving the private key, you can also choose a reminder comment, as well as an optional passphrase to protect your key, as shown in the image below. Note: If you do not protect your private key with a passphrase, anyone with access to your computer could SSH to your account on Negishi.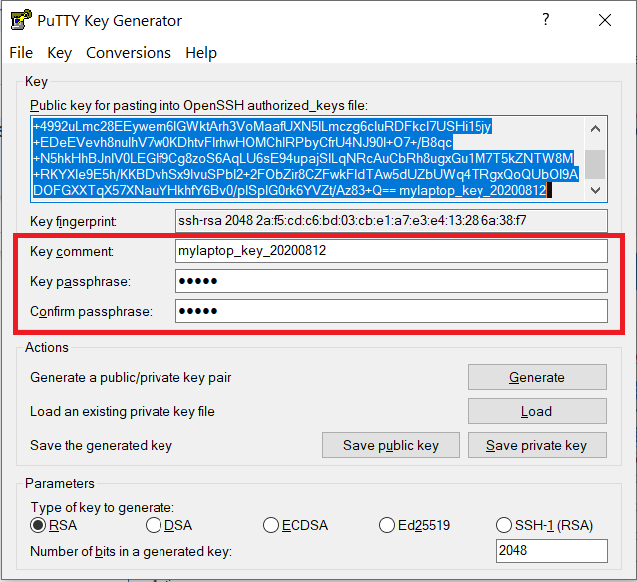
The PuTTY Key Generator form has inputs for the Key passphrase and optional reminder comment. From the menu of PuTTYgen, use the "Conversion -> Export OpenSSH key" tool to convert the private key into openssh format, e.g.
Documents\SSH_Keys\mylaptop_private_key.opensshto be used later for Thinlinc. -
Configure PuTTY to use key-based authentication:
Launch PuTTY and navigate to "Connection -> SSH ->Auth" on the left panel, click Browse button under the "Authentication parameters" section and choose your private key, e.g. mylaptop_private_key.ppk
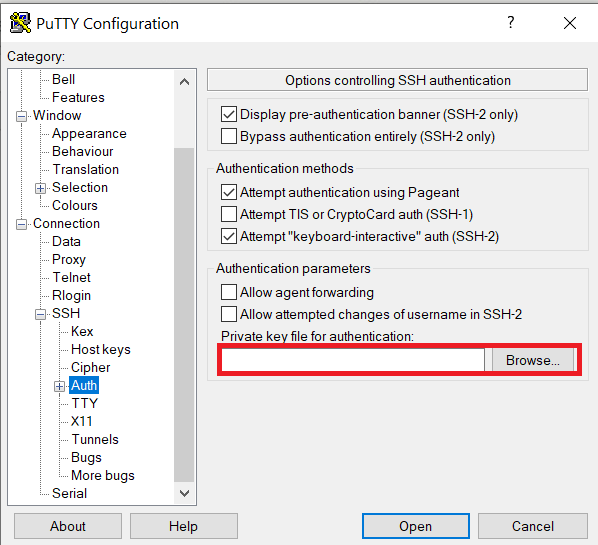
After clicking Connection -> SSH ->Auth panel, the "Browse" option can be found at the bottom of the resulting panel. Navigate back to "Session" on the left panel. Highlight "Default Settings" and click the "Save" button to ensure the change in place.
-
Connect to the cluster. When asked for a password, type your password followed by "
,push". Your Purdue Duo client will receive a notification to approve the login. Copy the contents of public key from PuTTYgen as shown below and paste it into$HOME/.ssh/authorized_keys. Please double-check that your text editor did not wrap or fold the pasted value (it should be one very long line).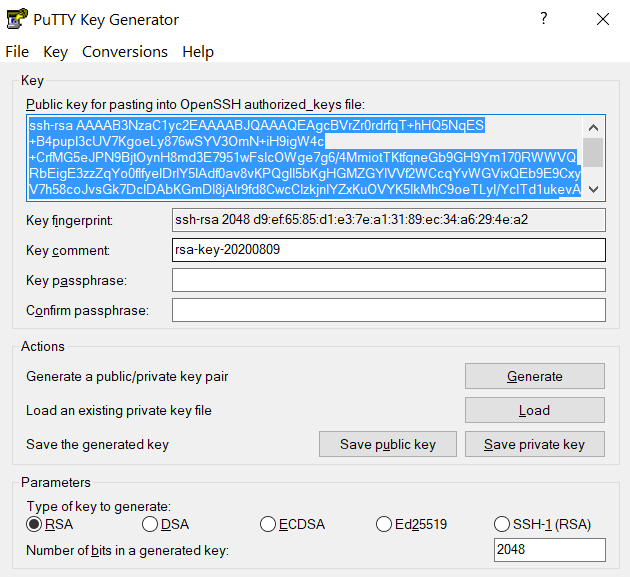
The "Public key" will look like a long string of random letters and numbers in a text box at the top of the window. - Test by connecting to the cluster. If successful, you will not be prompted for a password or receive a Duo notification. If you protected your private key with a passphrase in step 2, you will instead be prompted to enter your chosen passphrase when connecting.
SSH X11 Forwarding
SSH supports tunneling of X11 (X-Windows). If you have an X11 server running on your local machine, you may use X11 applications on remote systems and have their graphical displays appear on your local machine. These X11 connections are tunneled and encrypted automatically by your SSH client.
Link to section 'Installing an X11 Server' of 'SSH X11 Forwarding' Installing an X11 Server
To use X11, you will need to have a local X11 server running on your personal machine. Both free and commercial X11 servers are available for various operating systems.
Linux / Solaris / AIX / HP-UX / Unix:
- An X11 server is at the core of all graphical sessions. If you are logged in to a graphical environment on these operating systems, you are already running an X11 server.
- ThinLinc is an alternative to running an X11 server directly on your Linux computer. ThinLinc is a service that allows you to connect to a persistent remote graphical desktop session.
Microsoft Windows:
- ThinLinc is an alternative to running an X11 server directly on your Windows computer. ThinLinc is a service that allows you to connect to a persistent remote graphical desktop session.
- MobaXterm is a small, easy to use, full-featured SSH client. It includes X11 support for remote displays, SFTP capabilities, and limited SSH authentication forwarding for keys.
Mac OS X:
- X11 is available as an optional install on the Mac OS X install disks prior to 10.7/Lion. Run the installer, select the X11 option, and follow the instructions. For 10.7+ please download XQuartz.
- ThinLinc is an alternative to running an X11 server directly on your Mac computer. ThinLinc is a service that allows you to connect to a persistent remote graphical desktop session.
Link to section 'Enabling X11 Forwarding in your SSH Client' of 'SSH X11 Forwarding' Enabling X11 Forwarding in your SSH Client
Once you are running an X11 server, you will need to enable X11 forwarding/tunneling in your SSH client:
ssh: X11 tunneling should be enabled by default. To be certain it is enabled, you may usessh -Y.- MobaXterm: Select "New session" and "SSH." Under "Advanced SSH Settings" check the box for X11 Forwarding.
SSH will set the remote environment variable $DISPLAY to "localhost:XX.YY" when this is working correctly. If you had previously set your $DISPLAY environment variable to your local IP or hostname, you must remove any set/export/setenv of this variable from your login scripts. The environment variable $DISPLAY must be left as SSH sets it, which is to a random local port address. Setting $DISPLAY to an IP or hostname will not work.
ThinLinc
RCAC provides Cendio's ThinLinc as an alternative to running an X11 server directly on your computer. It allows you to run graphical applications or graphical interactive jobs directly on Negishi through a persistent remote graphical desktop session.
ThinLinc is a service that allows you to connect to a persistent remote graphical desktop session. This service works very well over a high latency, low bandwidth, or off-campus connection compared to running an X11 server locally. It is also very helpful for Windows users who do not have an easy to use local X11 server, as little to no set up is required on your computer.
There are two ways in which to use ThinLinc: preferably through the native client or through a web browser.
Link to section 'Installing the ThinLinc native client' of 'ThinLinc' Installing the ThinLinc native client
The native ThinLinc client will offer the best experience especially over off-campus connections and is the recommended method for using ThinLinc. It is compatible with Windows, Mac OS X, and Linux.
- Download the ThinLinc client from the ThinLinc website.
- Start the ThinLinc client on your computer.
- In the client's login window, use desktop.negishi.rcac.purdue.edu as the Server. Use your Purdue Career Account username and password, but append "
,push" to your password. - Click the Connect button.
- Your Purdue Login Duo will receive a notification to approve your login.
- Continue to following section on connecting to Negishi from ThinLinc.
Link to section 'Using ThinLinc through your web browser' of 'ThinLinc' Using ThinLinc through your web browser
The ThinLinc service can be accessed from your web browser as a convenience to installing the native client. This option works with no set up and is a good option for those on computers where you do not have privileges to install software. All that is required is an up-to-date web browser. Older versions of Internet Explorer may not work.
- Open a web browser and navigate to desktop.negishi.rcac.purdue.edu.
- Log in with your Purdue Career Account username and password, but append "
,push" to your password. - You may safely proceed past any warning messages from your browser.
- Your Purdue Login Duo will receive a notification to approve your login.
- Continue to the following section on connecting to Negishi from ThinLinc.
Link to section 'Connecting to Negishi from ThinLinc' of 'ThinLinc' Connecting to Negishi from ThinLinc
- Once logged in, you will be presented with a remote Linux desktop running directly on a cluster front-end.
- Open the terminal application on the remote desktop.
- Once logged in to the Negishi head node, you may use graphical editors, debuggers, software like Matlab, or run graphical interactive jobs. For example, to test the X forwarding connection issue the following command to launch the graphical editor gedit:
$ gedit - This session will remain persistent even if you disconnect from the session. Any interactive jobs or applications you left running will continue running even if you are not connected to the session.
Link to section 'Tips for using ThinLinc native client' of 'ThinLinc' Tips for using ThinLinc native client
- To exit a full screen ThinLinc session press the F8 key on your keyboard (fn + F8 key for Mac users) and click to disconnect or exit full screen.
- Full screen mode can be disabled when connecting to a session by clicking the Options button and disabling full screen mode from the Screen tab.
Link to section 'Configure ThinLinc to use SSH Keys' of 'ThinLinc' Configure ThinLinc to use SSH Keys
- The web client does NOT support public-key authentication.
-
ThinLinc native client supports the use of an SSH key pair. For help generating and uploading keys to the cluster, see SSH Keys section in our user guide for details.
To set up SSH key authentication on the ThinLinc client:
-
Open the Options panel, and select Public key as your authentication method on the Security tab.
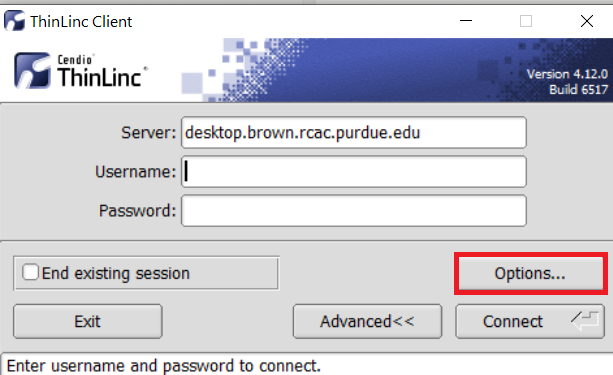
The "Options..." button in the ThinLinc Client can be found towards the bottom left, above the "Connect" button. -
In the options dialog, switch to the "Security" tab and select the "Public key" radio button:
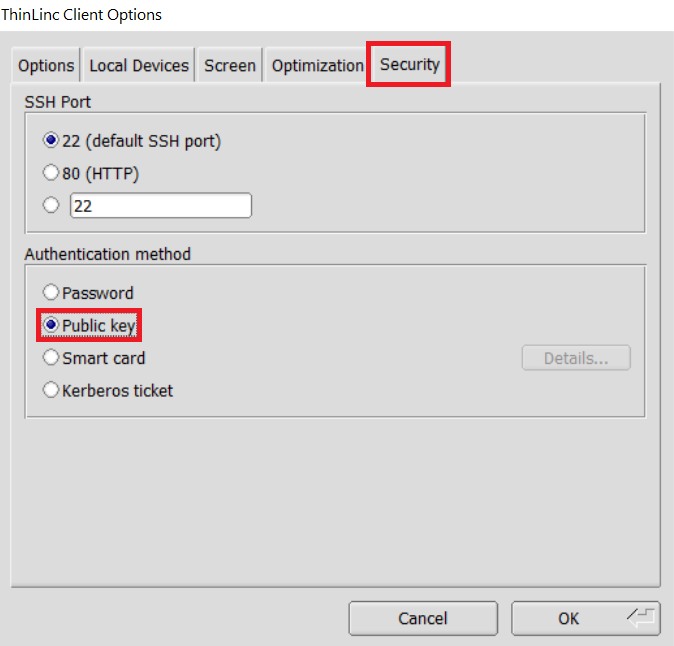
The "Security" tab found in the options dialog, will be the last of available tabs. The "Public key" option can be found in the "Authentication method" options group. - Click OK to return to the ThinLinc Client login window. You should now see a Key field in place of the Password field.
-
In the Key field, type the path to your locally stored private key or click the ... button to locate and select the key on your local system. Note: If PuTTY is used to generate the SSH Key pairs, please choose the private key in the openssh format.
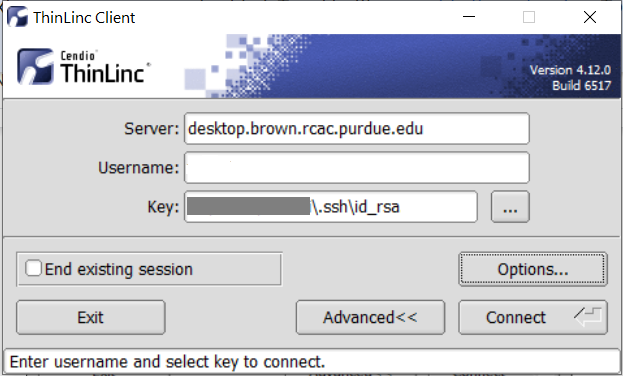
The ThinLinc Client login window will now display key field instead of a password field.
-
Purchasing Nodes
RCAC operates a significant shared cluster computing infrastructure developed over several years through focused acquisitions using funds from grants, faculty startup packages, and institutional sources. These "community clusters" are now at the foundation of Purdue's research cyberinfrastructure.
We strongly encourage any Purdue faculty or staff with computational needs to join this growing community and enjoy the enormous benefits this shared infrastructure provides:
- Peace of Mind
RCAC system administrators take care of security patches, attempted hacks, operating system upgrades, and hardware repair so faculty and graduate students can concentrate on research.
- Low Overhead
RCAC data centers provide infrastructure such as networking, racks, floor space, cooling, and power.
- Cost Effective
RCAC works with vendors to obtain the best price for computing resources by pooling funds from different disciplines to leverage greater group purchasing power.
Through the Community Cluster Program, Purdue affiliates have invested several million dollars in computational and storage resources from Q4 2006 to the present with great success in both the research accomplished and the money saved on equipment purchases.
For more information or to purchase access to our latest cluster today, see the Purchase page. Have questions? contact us at rcac-cluster-purchase@lists.purdue.edu to discuss.